About.com Interior Decorating: What's Hot Now

Thursday, January 22, 2009

Wallpaper Made Easy


Tools: wallpaper adhesive, glue brush, wallpaper brush, plastic scraper, large sponge, bucket, rags, drops, razor knife, straight edge, measuring tape.

The new wallcoverings are easier than ever. I've come to love the new handpainted selections from many providers. They can be easily installed without much of the old problems of before with alignment, corners and edging. They are durable and repairble are made with high quality components to withstand normal wear and tear. Because of the techniques used during installation, the product is repairable. A repair kit of paper is supplied with each order for the client.

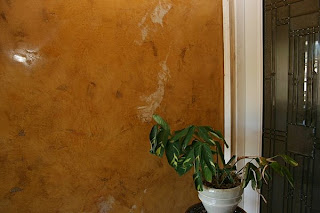
Washable it is recommended that you use only water on a soft towel and scrub the area lightly. If the damage is severe, clean the area well and get a piece of paper from the repair kit to fix the area.

These newer design are more in vogue, reflecting nature's organic feel of earth, stone, fire, and water. Coming in ranges from metallics, classics, old-world the selections are endless.The papers can be used in a bathroom. However, Vahallan recommends that the bathroom have air venting.

Installation:
Step One: Measuring your room

Measuring all your surfaces then multiply by 50% for overage and overlapping during installation. For example, on an average living room of 400 s.f. would be 400 x 1.5 = 600 s.f. total.

Step Two: Preparation and Protection

Prepare your room by removing pictures and furniture. You can lay a drop on the floor around the perimeter or use resin paper which comes in 3' width roll from your hardware store. No taping is required and most cracks, wall defects and small holes will be easily covered by the paper.

Step Three:
Begin by setting up a workspace. I like to use a portable table, layout my tools, glue, and have a 5 gallon bucket half full of warm water for rinsing. Upon receipt of your paper, roll out the stock and separate the sheets.

Step Four:
Types of Pattern Installation: Random and Block
Random

This is the most common and organic looking and easiest to install. The paper stock will come in 6' to 8' sheets, so begin by tearing the sheets into chunks about 2'x2' square, remember you don't have to be perfect as the jagged edge is what you want.

Use the straight edges sections along your baseboard and ceilings. If you are doing only one wall you can overlap in the corner and let dry and cut with a razor knife to get a straight edge.

After you've torn about 15 - 20 sheets you are ready to begin glueing. Take a sheet and on the back of the paper apply the glue with the large brush making sure to get all the corners, then "book" the paper by folding it onto itself over the surface you just glued. This allows the glue to absorb and set. Do about 5 pieces, then from your stack take the first booked paper and begin to
place it on the upper corner of your wall with the staight edge along the top and the jagged edges below.

Take your long 12" wallpaper brush to brush out the creases, then use a scraper beginning from the center outwards towards the edges to push out the remaining glue. Finally take a damp sponge and wipe down the surface to remove any excess glue.

Repeat this process moving first downward then across always leaving the jagged edges exposed as you overlap the pieces, you don't want any straight edges appearing. Also, as you get experienced try to match up your jagged edges to imitate large cracks as in a stone wall. Try to avoid using small pieces, but sometimes it is inevitable.

You can also easily apply over your lightswitch plates. Let them dry overnight and trim out the cutouts with a razor knife. When installing the swithc plates don't overscrew the screws as you may tear the paper.
Block
Pattern
All the same steps as before but in this instance you cut squares and rectangles of various sizes; always being sure to keep your lines as vertical and horizontal as possible. This is done by first drawing in blue chalk or pencil quidelines across your walls in a patchwork.
For more examples: go to the wallpaper gallery:


Monday, January 12, 2009

Faux Finishes, Venetian Plaster and Your Health


Molds are part of the natural environment. Outdoors, molds play a part in nature by breaking down dead organic matter such as fallen leaves and dead trees, but indoors, mold growth should be avoided. Molds reproduce by means of tiny spores; the spores are invisible to the naked eye and float through outdoor and indoor air. Mold may begin growing indoors when mold spores land on surfaces that are wet. There are many types of mold, and none of them will grow without water or moisture.

Can mold cause health problems?
Molds are usually not a problem indoors, unless mold spores land on a wet or damp spot and begin growing. Molds have the potential to cause health problems. Molds produce allergens (substances that can cause allergic reactions), irritants, and in some cases, potentially toxic substances (mycotoxins). Inhaling or touching mold or mold spores may cause allergic reactions in sensitive individuals. Allergic responses include hay fever-type symptoms, such as sneezing, runny nose, red eyes, and skin rash (dermatitis). Allergic reactions to mold are common. They can be immediate or delayed. Molds can also cause asthma attacks in people with asthma who are allergic to mold. In addition, mold exposure can irritate the eyes, skin, nose, throat, and lungs of both mold-allergic and non-allergic people. Symptoms other than the allergic and irritant types are not commonly reported as a result of inhaling mold. Research on mold and health effects is ongoing. This brochure provides a brief overview; it does not describe all potential health effects related to mold exposure. For more detailed information consult a health professional. You may also wish to consult your state or local health department.


How do I get rid of mold?

Molds gradually destroy the things they grow on. You can prevent damage to your home and furnishings, save money, and avoid potential health problems by controlling moisture and eliminating mold growth
It is impossible to get rid of all mold and mold spores indoors; some mold spores will be found floating through the air and in house dust. The mold spores will not grow if moisture is not present. Indoor mold growth can and should be prevented or controlled by controlling moisture indoors. If there is mold growth in your home, you must clean up the mold and fix the water problem. If you clean up the mold, but don't fix the water problem, then, most likely, the mold problem will come back.

Moisture and Mold Prevention and Control Tips
Actions that will help to reduce humidity
· Vent appliances that produce moisture, such as clothes dryers, stoves, and kerosene heaters to the outside where possible. (Combustion appliances such as stoves and kerosene heaters produce water vapor and will increase the humidity unless vented to the outside.)
· Use air conditioners and/or de-humidifiers when needed.
¨ Run the bathroom fan or open the window when showering. Use exhaust fans or open windows whenever cooking, running the dishwasher or dishwashing, etc.

Actions that will help prevent condensation
· Increase ventilation or air movement by opening doors and/or windows, when practical. Use fans as needed.
· Cover cold surfaces, such as cold water pipes, with insulation.
· Increase air temperature.
· Use of lime-based venetian plaster on walls and ceilings

Lime Paint and Lime Venetian Based Plasters are mold resistant
· Use a lime-based plaster over existing paper based wallboard. Newer wallboard with fiberglass covering versus the paper will not harbor molds since it’s non-organic, but removal and replacement in existing structures can be costly.
¨ An alternative would be to go over existing wallboard with a lime-based plaster to permanently inhibit mold and mildew growth.


Asthmatics and people with respiratory problems or impaired immune systems would be advised to consider lime-based plasters as a natural preventative to inhibit mold and mildew infestations.

Lime venetian plaster is a completely natural product used to create interior and exterior finishes. With its low embodied energy compared to Portland cement and entirely zero VOC properties; it is an excellent environmentally friendly choice to enhance the health and beauty of modern and historical buildings alike.

Lime plaster produces a breathable and elastic surface which helps reduce the risk of mold development and dry rot. Made essentially from calcium hydroxide and sand, it slowly turns into limestone when exposed to free carbon dioxide in the atmosphere.
Mold growing outdoors on firewood. Molds come in many colors; both white and black molds are shown here.
Why is mold growing in my home?
Magnified mold spores
Condensation on the inside of a windowpane.
Excerpted from the E.P.A.
geovisit(); www.venetianplasterdecor.com

Sunday, January 4, 2009

Metallics Are Vogue! Hot NEW Decorative Finishes


Metallics have been on the rise for some time now and are quite simple in application but don't go overboard. A little goes a long way.


The brand I like most is Modern Masters but you can find many alternatives at both Home Depot or Lowes. Keep in mind that depending on your application some are opaque while others are semi-translucent and will not cover your surface. In all cases it's imperative to apply an undercoat within the same color range as your intended finish.


One of my favorites is copper metallics with a eggplant glazing. If you've some texture on your walls the glazing will adhere giving depth and the metallic a nice richness. There are special rollers for metallics to help avoid lap lines but a nice and easy alternative is while rolling on your finish just use a dry brush to soften those lap lines. Simply take the 4" dry brush and lightly go against the direction of your lap line, also make some additional random brush strokes throughout your wall to even out the pattern. Often I've used a circular brush called a "neon" to make soft circles in my finishes which reveal a beautiful pattern.


Tools: metallic paint, 4" brush, 9" roller, glazing compound.


Have fun! Vaughn

Friday, January 2, 2009

Frottage: Faux & Plaster Made Easy


Simple techniques are the best and can be repeated even by novices.
Don't sweat it you can always repaint over it. Experiment and try different tools. Here are just a few:

Frottage: Using paper or plastic to create a texture. TOOLS: PLASTIC or Paper, trowel, 6" roller, scissors, hawk.I really like this method for its ease and rapid ability to give great variation without much effort. Either using a glazing compound [1:1:1] equal parts of paint, water, glaze; or use a cheap acrylic plaster from Lowes or Home Depot. Do all your prep, tape, repairs and begin in an upper corner working in a 3' width reaching all the way down to the floor. Have your paper/plastic torn in 3' wide sections that'll reach the floor and crinkly them up.
Trowel if your using plaster, roll if your using glaze your 3' section, then apply the plastic and/or paper, let set for 15-20 minutes in a 70 degree air temperature, and remove and throw away. While that is drying move onto the next section and repeat.
After completing a wall, you can do variations, by sealing the plaster and glazing over with another color or even using a wax. Visit my website for for examples: http://www.venetianplasterdecor.com/

Have fun! Vaughn